Right sides together line up front and back bodice of the t-shirt pattern. This classic metal cuff isnt as tough as it looks to make.

Pin On Upcycled Fashion
The decal size for the back of the shirt can depend on the shirts size and preference.

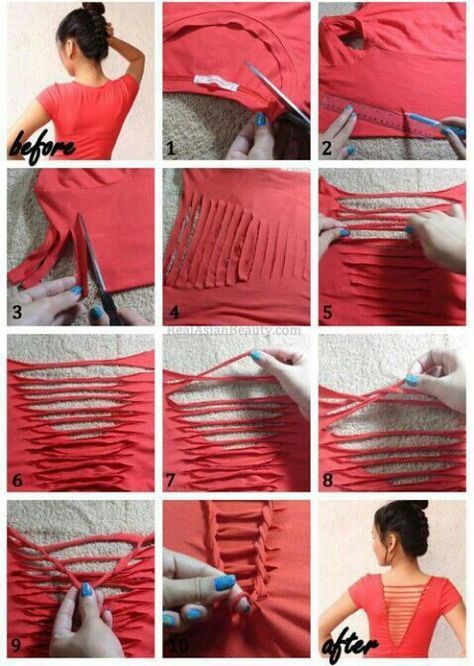
. Measure 3 down from the center of the collar. A willing model a long t-shirt for them plenty of duct tape scissors plastic wrap thick black pen. Be sure to fold the t-shirt in half vertically so you can measure out equal cutlines on both sides along the center front and back.
The best way to remove baseboards is to run a utility knife along the top of the baseboard where your caulk line is. You can use the Circut Design Space template to visualize how your image will look on the back of your shirt. The materials needed for this DIY home server rack include rack studs cable management old tiles zip ties and a modular patch panel.
We will cover how to design a custom shirt in Cricut Design Space to cutting it weeding the iron-on vinyl and then how to apply the design to a t-shirt. Remember you cant cut out the full letter for the most part you need to leave little holders behind otherwise some letters will end up looking very weird. Attaching Neck Binding to the Free T-shirt Pattern.
Download Free SVG Cut Files Create your DIY shirts decals and much more using your Cricut Explore Silhouette and other cutting machines. As a guideline use the following for adults shirt size Small to L. This therefore makes it too time-consuming and cost-ineffective beyond the 16-t-shirt mark.
The modular patch panel is recommended because it doesnt require punching down keystones as in the case of the traditional panels. Thats due to the fact that the set-up time is little relative to that of screen printing. Next use a pry bar and hammer to get it behind the baseboard and pry it off of the wall.
Dont forget- if you decide to use the flat method see binding tips above only sew one shoulder closed Step 4. In fact even with just a few materials its pretty easy to. The baseboards in the corner of your kitchen will need to be removed in order to install your corner bench seating.
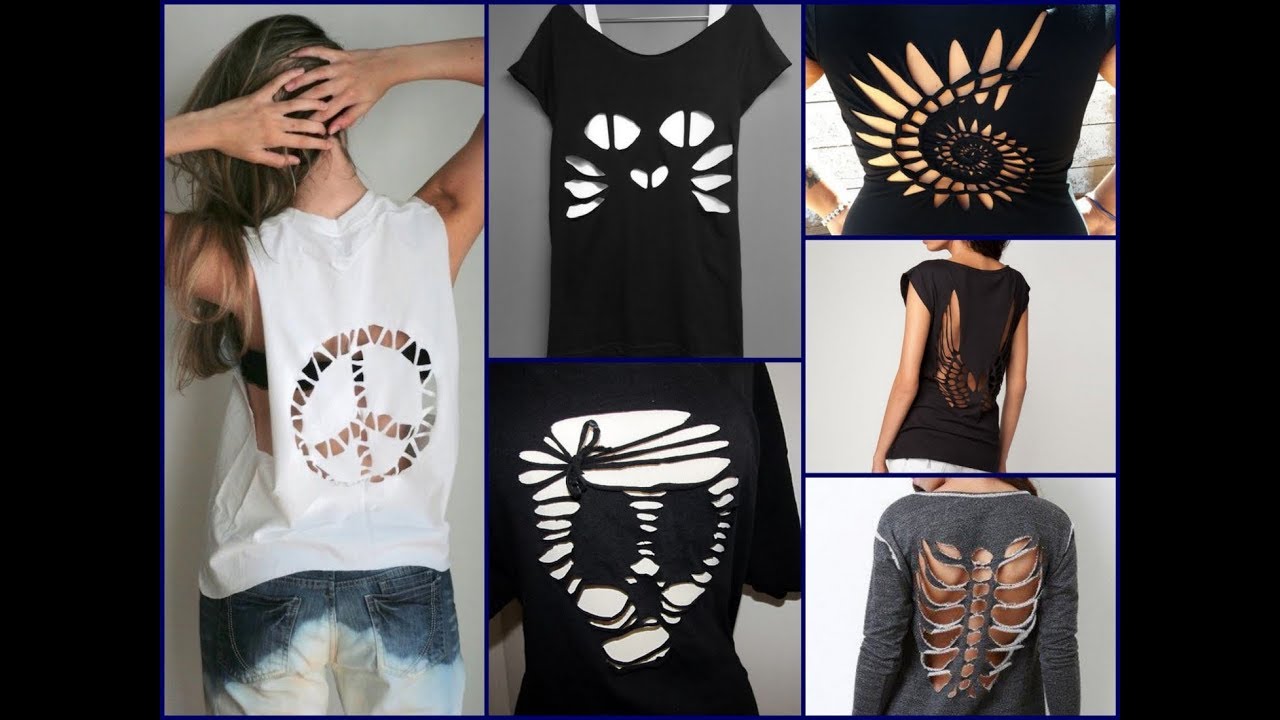
First trace around the front collar with 2 inches added to the sides and 1 inch on the bottom. 10 X 10 decal size. Create a simple scoop neck by using a plate as a template and cutting a brand new neckline.
Get fancy with your cutting techniques and turn your t-shirt into a halter top. Sew together at shoulders using a 38 inch seam allowance. It also came with an HDMI extension.
You will initially need to start wrapping the duct tape crossways from the bottom of the t-shirt which should be somewhere around the mid-thigh area. Homemade earrings arent as tough as youd think to create. So follow this tutorial and create this striking piece its sure to sell.
Have your model stand comfortably wearing the long t-shirt you have provided. DIY Server Rack Build. Cut along the lines you drew and either leave the edges raw or hem them for a neater finish.
However this method is much slower than screen printing as each t-shirt needs its own setup. To modify a T-shirt to make it cuter try cutting the collar off to make a scoop neck. Once the design is ready tape it down on your shirt and also make sure to tape down some paper surrounding the.
Vinyl printing is suitable for very small runs of up to 16 t-shirts. So for this tutorial I wanted to share everything that goes into Cricut shirt making from the beginning to the end.
Pin On Diy

31 T Shirt Diys That Are Perfect For Summer T Shirt Diy Diy Clothes Diy Shirt

Pin On Mine

Pin On A Place For Craft Projects
Pin On Clothing

Pin On Skateswagger Custom T Shirt Cutting

Pin On Tshirt Ideas

Pin On Transform A

Pin On Cosas Hechas A Mano

Pin On Tシャツリメイク

Pin On Tshirt

Diy Fringe Top Diy Clothes Diy Fashion Diy Clothes Refashion

Sabrina Turner Design T Shirt Redesign Diy Clothes T Shirt Diy

Pin On Blogger Buddies Share
Pin On Diy Fashion

Pin On Sewing Projects

Pin On T Shirt

Pin On Diy Inspiraciones

Pin On Sewing Clothes Dresses
This is dummy text. It is not meant to be read. Accordingly, it is difficult to figure out when to end it. But then, this is dummy text. It is not meant to be read. Period.
ConversionConversion EmoticonEmoticon